The bluntslide is a fundamental skateboarding trick that bridges the gap between basic grinds and more advanced maneuvers. It involves sliding on the board’s tail or nose along an edge, typically a ledge or rail, with the truck positioned over the obstacle. Mastering the bluntslide requires a combination of balance, timing, and commitment. It’s a trick that, once learned, opens up a world of possibilities for creative skating and progression. Whether you’re looking to elevate your street skating game or simply add a new dimension to your repertoire, understanding the mechanics and execution of the bluntslide is essential.
This guide aims to refine your understanding and execution of the bluntslide, offering practical corrections and competitor-level details. We’ll delve into stance variants, surface preparation, and the ideal learning progression, ensuring you have the knowledge to master this essential trick.
Key Takeaways
- Understanding the Bluntslide Skateboarding Trick:The bluntslide is a foundational ledge, rail, curb, or coping trick where the rider slides on the tail or nose, with the truck positioned over the obstacle.
- Proper Setup and Approach for a Bluntslide:Proper setup and approach are crucial, including ollieing high enough, aligning your body, and approaching the obstacle at a slight angle.
- Key Components of Performing a Bluntslide:Key components of the trick are the ollie, commitment, balance, and the dismount.
- Common Bluntslide Mistakes and How to Avoid Them:Common mistakes include bailing too early, not ollieing high enough, improper truck placement, and not using enough speed or wax on stickier surfaces.
- Bluntslide Progression and Trick Combinations:Progression involves practicing on different obstacles, varying speeds, and combining with other tricks.
- Bluntslide Safety Tips and Protective Gear:Safety is paramount, so always wear protective gear and start on forgiving surfaces.

Credit: www.skatedeluxe.com
Understanding The Bluntslide: Anatomy Of The Trick
The bluntslide is a trick that tests your ability to control your board’s trajectory and balance while in motion along an edge. Unlike a typical grind where the truck’s hanger grinds directly on the coping or ledge, in a bluntslide, the board itself slides. Specifically, the tail or nose of the board makes contact with the obstacle, with the truck acting as a pivot or guide. There are two primary variations: the tailslide (sliding on the tail) and the noseslide (sliding on the nose). For the purpose of this guide, we will primarily focus on the tailslide as it’s generally the first variation skateboarders learn.
Tailslide Vs. Noseslide: Key Differences
-
- Tailslide: The rider ollies and pivots their board so that the tail of the deck is perpendicular to the ledge or rail. The back truck then goes over the obstacle, acting as a stabilizing point. The slide occurs on the underside of the tail. This is often considered the more accessible of the two.
- Noseslide: This is the opposite of a tailslide. The rider ollies and pivots their board so the nose is perpendicular to the obstacle. The front truck goes over the obstacle, and the slide occurs on the underside of the nose. This trick requires more precision and often a higher ollie.
For beginners, focusing on the tailslide is highly recommended as it allows for a more natural body position and a slightly more forgiving landing. Understanding these differences is crucial for setting the right expectations and focusing your practice.
Frontside And Backside Considerations
Bluntslides are often broken into frontside and backside versions, and that distinction matters because the shoulders, hips, and exit direction change the feel of the trick.
-
- Frontside bluntslide: Your chest generally faces more toward the obstacle as you lock in, which usually makes spotting the slide and the exit easier for many skaters.
- Backside bluntslide: Your back faces more toward the obstacle during the slide, which can feel more awkward at first but is common once skaters get comfortable with the motion.
The same trick mechanics still apply, but the approach, shoulder positioning, and roll-away direction should match the stance version you are trying.
Essential Gear For Bluntslides
Before you even think about attempting a bluntslide, ensuring you have the right gear is paramount. This not only enhances your ability to perform the trick but also contributes significantly to your safety.
-
- Skateboard Deck: A sturdy deck with a good pop is essential. For street skating and attempting tricks like bluntslides, decks typically range from 7.75 to 8.5 inches wide. The shape can also play a role, with some riders preferring a slightly wider tail for bluntslides. If you’re unsure about what to choose, check out our guide on how to choose a skateboard deck.
- Trucks: Your trucks should be properly tightened to provide stability but not so tight that they hinder your ability to ollie or pivot. The width of your trucks should match your deck width.
- Wheels: Medium-sized wheels (around 52-54mm) with a moderate hardness (99a-101a) are generally suitable for street skating and tricks. They offer a good balance of grip and slide.
- Protective Gear: This is non-negotiable. A certified helmet, knee pads, elbow pads, and wrist guards are crucial. Falling is an integral part of learning, and proper protection can prevent serious injuries. For more on this, see our guide on what to wear for skateboarding.

Credit: www.youtube.com
Mastering The Prerequisites: Building The Foundation
Attempting a bluntslide without a solid grasp of its foundational tricks is like trying to build a house without a foundation; it’s destined to crumble. The bluntslide relies heavily on your ability to execute a few key maneuvers smoothly and consistently.
The Ollie: Your Gateway To Air
The ollie is the cornerstone of almost every skateboard trick, and the bluntslide is no exception. You need to be able to ollie high enough to get your board over the ledge or rail and position your back truck correctly.
-
- Pop: This is the initial snap of your tail off the ground, creating the upward momentum.
- Slide: As you jump, slide your front foot up the board towards the nose. This levels out the board in the air.
- Leveling: The goal is to get the board as flat and level as possible before it reaches the obstacle.
If your ollie is inconsistent or lacks height, focus on drilling that first. Practice ollieing over small objects, then gradually increase the height. A strong, consistent ollie is the most critical prerequisite for a successful bluntslide.
Board Control And Balance
Beyond the ollie, you need to develop a keen sense of board control and balance. This includes:
-
- Foot Placement: Knowing where to position your feet for the ollie and how to adjust them mid-air is vital. For a bluntslide, your back foot needs to be in a position to allow for the tail to pivot over the obstacle.
- Body Positioning: Your body weight distribution is key. You need to lean back slightly to keep the tail down but also maintain enough forward momentum to slide.
- Riding Speed: You’ll need to approach the obstacle at a comfortable, consistent speed. Too slow and you won’t have enough momentum; too fast and you might overshoot or lose control.
Developing these skills can be achieved through consistent practice of basic riding, tic-tacs, manuals, and ollies on flat ground and over small obstacles.
Understanding Obstacles
The type of obstacle you choose to learn on will significantly impact your learning curve.
-
- Ledge vs. Rail: Ledges are generally easier for beginners as they offer a flatter surface to slide on. Rails can be more challenging due to their roundness and the potential for the board to slip off. Curbs are also common practice obstacles, and transitions/copings are another traditional place to learn blunt-style locking tricks.
- Height: Start with a very low ledge, think curb height or even lower. This reduces the commitment needed for the ollie and makes bailing less intimidating. As you gain confidence, you can gradually move to taller obstacles.
- Surface: A smooth, consistent surface is ideal. Rough concrete or uneven ground can make the slide unpredictable.
- Wax and friction: A little wax can help the board lock in and slide more consistently on concrete or rougher ledges. Too much wax can make the trick feel slippery, so use it sparingly and only where allowed.
Step-by-step Guide To Performing A Bluntslide (tailslide)
Learning the bluntslide is a process of breaking it down into manageable steps. Each step builds upon the last, and consistent practice is key to linking them all together.
1. The Approach
-
- Speed: Approach the ledge or rail at a moderate, consistent speed. You want enough momentum to carry you across the obstacle but not so much that you feel out of control.
- Angle: Approach the obstacle at a slight angle, roughly 30-45 degrees. This angle helps you pivot your board into the correct position for the bluntslide.
- Foot Placement: Position your back foot on the tail of the board, ready to pop the ollie. Your front foot should be comfortably placed further up the board, similar to your ollie stance.
2. The Ollie And Pivot
-
- Ollie: As you reach the obstacle, perform a strong ollie. The height of your ollie is crucial; you need to get high enough for your back truck to clear the edge and for your tail to land on top of it.
- Pivot: As your board reaches its apex in the ollie, subtly pivot your hips and shoulders. This motion, combined with your approach angle, will begin to turn your board so that your tail is perpendicular to the ledge. Think of it as a slight sidestep with your board.
3. Landing And Sliding
-
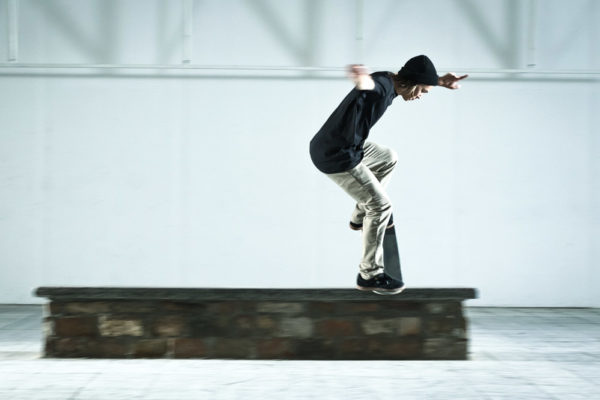
- Truck Placement: The goal is for your back truck to go over the ledge. This is what stabilizes you and allows for the slide. Your tail should land on top of the ledge, perpendicular to its length.
- Balance: This is the most critical phase. You’ll need to lean back slightly to keep the tail on the ledge and prevent yourself from falling forward. Distribute your weight evenly over the board. Keep your knees bent and arms out for balance.
- The Slide: Maintain a smooth, controlled slide along the ledge. Focus on keeping your weight centered and your tail on the obstacle. Avoid jerky movements. The slide should feel controlled, not like you’re just being carried by momentum.
4. The Dismount
-
- Exiting the Slide: As you approach the end of the ledge, or when you feel ready to dismount, prepare to exit.
- Leaning Forward: Gently shift your weight forward. This will allow your back truck to roll off the ledge.
- Landing: As your back truck clears the edge, your board should naturally come back underneath you, allowing you to land smoothly on the ground. Absorb the impact by bending your knees.
Credit: www.skatedeluxe.com
Practicing And Troubleshooting Common Issues
Learning the bluntslide is rarely a seamless process. Expect to fall, get frustrated, and have moments of doubt. The key is to identify common problems and work through them systematically.
Common Mistakes And How To Fix Them
-
- Not Ollieing High Enough:
- Problem: Your back truck hits the ledge, or you don’t get your tail onto the obstacle.
- Solution: Focus on popping your tail harder and bringing your front foot up more decisively during the ollie. Practice ollies on flat ground and over small obstacles until you gain more height and consistency.
- Not Ollieing High Enough:
-
- Board Not Turning Enough:
- Problem: Your board lands parallel to the ledge, or you can’t get your tail over.
- Solution: Ensure you’re approaching at a sufficient angle (around 30-45 degrees). Practice the pivot motion on flat ground, ollie and try to turn your board 90 degrees in the air. Focus on rotating your hips and shoulders into the turn.
- Board Not Turning Enough:
-
- Falling Forward:
- Problem: You land on the ledge but immediately fall forwards off the front of the board.
- Solution: You’re not leaning back enough. Consciously shift your weight backward. Keep your arms extended to help maintain balance. Imagine you’re trying to sit back onto the tail of the board.
- Falling Forward:
-
- Not Sliding:
- Problem: Your tail gets stuck on the ledge, or you don’t slide at all.
- Solution: Ensure the underside of your tail is relatively smooth. Sometimes, excessively grippy griptape can hinder the slide. Also, make sure your back truck is over the ledge, not grinding on it. You need the board’s tail to be the primary contact point. A light layer of wax on the obstacle can also help.
- Not Sliding:
-
- Bailing Too Early:
- Problem: You bail out of the trick before even attempting to slide.
- Solution: This often stems from fear and a lack of commitment. Start on very low obstacles to build confidence. Visualize the trick successfully and commit to the ollie and pivot. Remember, falling is part of learning, so try to fall safely.
- Bailing Too Early:
Progression Drills
-
- Manuals: Practicing manuals helps improve your balance and ability to shift your weight backward, which is crucial for the bluntslide.
- Tail Pivots: On flat ground, practice ollieing and pivoting your board 90 degrees so your tail is facing forward. This isolates the turning motion.
- Board Slides on Flat Ground: Practice ollieing and landing with your board sideways on the ground, mimicking the bluntslide position. This helps you get used to the feel of sliding.
- Low Ledge Practice: Find a very low, smooth ledge (like a curb) and practice ollieing and landing your tail on it, even if you don’t slide. This builds confidence and muscle memory for getting the board into position.
When I first learned bluntslides, I struggled immensely with falling forward. My issue was not committing to leaning back enough. I spent a session just practicing ollieing onto the ledge and intentionally leaning back, even if I didn’t slide. This helped my body understand the correct weight distribution. Eventually, the slide came naturally.
Variations And Advanced Techniques
Once you’ve got the basic tailslide down, the world of bluntslides opens up to more creative possibilities and challenging variations.
Noseslides
As mentioned earlier, the noseslide is the counterpart to the tailslide. The execution is similar, but the board is oriented with the nose over the obstacle.
-
- Approach: Similar angled approach.
- Ollie and Pivot: You ollie higher and pivot your board so the nose is perpendicular to the obstacle.
- Landing: The front truck goes over the obstacle, and the nose slides.
- Balance: You’ll need to lean forward slightly to maintain balance.
Noseslides are generally considered more difficult due to the need for a higher ollie and a more precarious forward balance.
Fakie And Switch Bluntslides
-
- Fakie Bluntslide: Performing a bluntslide while riding backward (fakie). This requires you to ollie and pivot from your fakie stance. The mechanics are the same, but your spatial awareness and control are tested differently.
- Switch Bluntslide: Performing a bluntslide while riding in your non-dominant stance (switch). This is significantly more challenging as it requires mastering the ollie and pivot with less natural control.
Bluntslide To Fakie/Nollie Out
This advanced variation involves performing a bluntslide and then exiting the trick by ollieing out backwards (fakie) or with a nollie (ollieing off the nose). It requires precise timing and control during the dismount.
Combining With Other Tricks
The true artistry of skateboarding often lies in combining tricks. Once you’re comfortable with the bluntslide, consider linking it with:
-
- Manuals: Bluntslide out into a manual.
- Ollies: Bluntslide off a ledge and immediately ollie over an obstacle.
- Other Grinds/Slides: Transition from a bluntslide into a 50-50 grind or a boardslide.
These combinations elevate the bluntslide from a standalone trick to a dynamic part of a larger sequence.
Safety First: Minimizing Risk
Skateboarding is inherently risky, and attempting new tricks like the bluntslide requires a mindful approach to safety. Prioritizing safety will not only prevent injuries but also build the confidence needed to progress.
Protective Gear Is Non-negotiable
As emphasized before, always wear a helmet, knee pads, elbow pads, and wrist guards. A serious fall without protection can lead to injuries that sideline you for weeks or months. Ensure your gear fits properly and is in good condition. For more detailed advice, refer to our guide on skateboarding gear.
Choosing The Right Spot To Practice
-
- Start Low and Smooth: Begin on a very low, smooth ledge. A concrete curb or a low, well-maintained skatepark ledge is ideal. Avoid rough or broken concrete, as it can catch your wheels or board and cause unexpected falls.
- Clear the Area: Ensure the landing area is free of debris, rocks, or cracks that could trip you up. Check for pedestrians or other skaters who might be in your path.
- Gradual Progression: Don’t jump from a curb to a 4-foot ledge. Incrementally increase the height and difficulty of the obstacles as your confidence and skill grow.
- Use wax responsibly: Wax can improve slide consistency, but only use it where it is allowed and where it won’t make the spot unsafe for others.
Learning To Fall Safely
Falling is an unavoidable part of skateboarding. Learning to fall correctly can significantly reduce the risk of injury.
-
- Tuck and Roll: If you feel yourself losing balance, try to tuck your body and roll rather than trying to brace yourself with your hands or arms. This distributes the impact over a larger area.
- Avoid Stiffening Up: Tensing your body makes you more susceptible to fractures. Try to stay loose and let your body absorb the impact.
- Use Your Pads: Don’t be afraid to let your pads take the impact. That’s what they’re there for.
Understanding Your Limits
It’s crucial to know when to push yourself and when to take a break. Fatigue significantly increases the risk of injury. If you’re feeling tired, sore, or mentally drained, it’s best to call it a day. Pushing through exhaustion can lead to mistakes and accidents.
The Bluntslide In Skateboarding Culture
The bluntslide, while a technical trick, is more than just a series of movements; it’s woven into the fabric of skateboarding culture. It represents a progression from basic flatground tricks to engaging with the urban environment as a playground. Skaters who master the bluntslide are often seen as having a solid grasp of street skating fundamentals.
Influence On Street Skating
Street skating emphasizes creativity and the use of urban architecture, ledges, stairs, rails, as obstacles. The bluntslide is a prime example of this, transforming a mundane ledge into an opportunity for a stylish slide. Its execution requires a certain flair and control that is highly respected within the community. Many iconic skateboarding videos feature skaters executing bluntslides with impressive style and on challenging obstacles.
Developing Style And Confidence
Mastering the bluntslide, like any significant skateboarding trick, builds immense confidence. The commitment required to ollie onto an obstacle and slide across it, then land cleanly, is a significant mental hurdle to overcome. As skaters progress, they begin to develop their own unique style in how they perform the trick, the speed of their approach, the fluidity of their pivot, the smoothness of their slide, and the style of their exit. This personal expression is a core element of skateboarding culture.
Bluntslides In Media And Contests
You’ll frequently see bluntslides featured in skateboarding videos, magazines, and even professional competitions. They are often used as a way to demonstrate a skater’s technical ability and creativity. While not always the most visually complex trick, a well-executed bluntslide with great style can be just as impactful as a more technically demanding maneuver. It’s a trick that bridges the gap between intermediate and advanced, making it a staple for skaters looking to level up their skills. For those looking to advance their trick repertoire, exploring intermediate skateboard tricks is the next logical step.
Frequently Asked Questions
What Is The Difference Between A Bluntslide And A Boardslide?
A bluntslide involves sliding on the tail or nose of the skateboard with the truck positioned over the obstacle. A boardslide, on the other hand, involves sliding on the underside of the deck between the trucks, with the obstacle passing underneath the board. The board is typically oriented parallel to the obstacle in a boardslide.
How Important Is The Angle Of Approach For A Bluntslide?
The angle of approach is critically important. Approaching at a slight angle (around 30-45 degrees) allows you to pivot your board more easily into the correct position for the bluntslide, where the tail or nose is perpendicular to the ledge and the truck is over it. A direct, straight approach makes it much harder to get the board into the sliding position.
Is It Easier To Learn Tailslides Or Noseslides First?
For most beginners, tailslides are significantly easier to learn first. The ollie required is generally lower, and the body’s natural balance tends to favor leaning back slightly, which is necessary for a tailslide. Noseslides require a higher ollie and a more precarious forward balance, making them more challenging.
How Can I Prevent My Tail From Getting Stuck On The Ledge During A Bluntslide?
Ensure your back truck is properly positioned over the ledge. The goal is for the truck to act as a guide, not to grind. Also, make sure the underside of your tail is relatively smooth. If your griptape is excessively grippy or your tail is damaged, it can impede the slide. Keeping your weight centered and avoiding sudden movements during the slide can also help. A small amount of wax on the obstacle can improve consistency on sticky surfaces.